Tuesday, January 23, 2024

WS2812B LED Fireworks Simulator


-----

WS2812B LED strips are pretty cool.  They are string of individually addressable RGB LEDs.  This allows control of the color and brightness of each LED.

Fireworks are also pretty cool.  On the downside they can be dangerous, scare wildlife, start fires, be expensive, illegal, etc.   So, until we can afford our own fleet of drones we settled on this alternative.  Like many projects, we stand on the shoulders of giants mentioned in the Ardunio source code below.  Our main issue with their code was the effect was never changing so we improved mainly on that aspect; a few other things as well.

----

Result:

-----

The hardware is an ESP8266 and a WS2812B LED-strip with 300 LEDs (16.5 feet).  We wanted to use a Ardunio Nano (because we had one), but due to the amount of memory needed to define the arrays for the 300 LEDs we went with an ESP8266 (because we had one).

-----
You are also going to need a big pole.


-----

/*  
 *  LED Fireworks Simulator
 *  WhiskeyTangoHotel.Com
 *  JAN 2024
 *
 *  To vary the effect experiments randomizing variables
 *  within acceptable limits was done.  Otherwise the effect
 *  just looks to same 'shot after shot'.  Other mods as well
  *
 *  Leverage from https://www.Daniel-Westhof.de and
 *  https://www.anirama.com/1000leds/1d-fireworks/
 *
 *  Hardware:  
 *  HiLetgo 1PC ESP8266 NodeMCU CP2102 ESP-12E Development Board and a
 *  WS2812B LED-strip with 300 LEDs (16.5 feet).
 */
 
#include <FastLED.h>
#define NUM_LEDS 300
#define DATA_PIN 5  // Labeled a D1 on the board.
#define LED_PIN 2  // This is the BLUE LED on board
#define NUM_SPARKS NUM_LEDS/2  // OG: NUM_LEDS/2
 
CRGB leds[NUM_LEDS]; // sets up block of memory
 
float sparkPos[NUM_SPARKS];
float sparkVel[NUM_SPARKS];
float sparkCol[NUM_SPARKS];
float flarePos;
float gravity = -.008; // m/s/s
int launch_delay; // we later randomize seconds between launches
 
void setup() {
  Serial.begin(115200);
  FastLED.addLeds<NEOPIXEL, DATA_PIN>(leds, NUM_LEDS);
  pinMode(LED_PIN, OUTPUT);
}
 
void loop() {   
  // Delay untill next launch. Blink BLUE on board LED
  Serial.println("  ");
  launch_delay = int(random(5,30)); // Min>=5.  Randomize secs between BOOMs.  
  //launch_delay = 5;   
  for (int i = (launch_delay - 5); i > 0; i--) {
    Serial.println(String(i + 5) + " seconds to launch...");
    digitalWrite(LED_PIN, LOW);  // ON
    delay(500);
    digitalWrite(LED_PIN, HIGH);  // OFF
    delay(500);    
  }

  // Slower timer done .  Fast blink for ~5 seconds to warn of BOOM
  Serial.print("5 seconds to launch!!!");
  for (int i = 50; i > 0; i--) {
    Serial.print(".");
    digitalWrite(LED_PIN, LOW);  // ON
    delay(50);
    digitalWrite(LED_PIN, HIGH);  // OFF
    delay(50);
  }

  Serial.println(".");
  Serial.print("BOOM...");
  digitalWrite(LED_PIN, LOW); // LED ON
 
  // send up flare
  flare();
  digitalWrite(LED_PIN, HIGH); // LED OFF
 
  // explode
  explodeLoop();
}
 

void flare() {
  flarePos = 0;  // 0
  // flareVel is how hight the BOOM is.  2.2 is max height
  float flareVel = float(random(180, 215)) / 100; // Start: (180, 195)) / 100; trial and error to get reasonable range
  Serial.println(" with flare height of " + String((flareVel*100)/2.2) + "%");  // How high is the BOOM?
  float brightness = 5;   // OG: 1
 
  // initialize launch sparks
  int blast_base = random(5,20);  // number of sparks at blast base.
  for (int i = 0; i < blast_base; i++) {   // OG: int i = 0; i < 5; i++  
    sparkPos[i] = 0; sparkVel[i] = (float(random8()) / 255) * (flareVel / 2); // OG: (float(random8()) / 255) * (flareVel / 5); the / xx); is control value for BURST
    sparkCol[i] = sparkVel[i] * 1000; sparkCol[i] = constrain(sparkCol[i], 0, 255);
    //Serial.println(String(i) + "   " + String(sparkVel[i]) + "  " + String(sparkCol[i]));
  }  

  // launch
  while (flareVel >= -.2) {   // OG: flareVel >= -.2  when to explode after peak BOOM.  Bigger neg val means more fall before sparks
    // sparks
    for (int i = 0; i < blast_base; i++) {   // OG: int i = 0; i < 5; i++  
      sparkPos[i] += sparkVel[i];
      sparkPos[i] = constrain(sparkPos[i], 0, 120);
      sparkVel[i] += gravity;
      sparkCol[i] += -.8;
      sparkCol[i] = constrain(sparkCol[i], 0, 255);
      leds[int(sparkPos[i])] = HeatColor(sparkCol[i]);
      leds[int(sparkPos[i])] %= 50; // reduce brightness to 50/255
    }
   
    // flare
    leds[int(flarePos)] = CHSV(0, 0, int(brightness * 255));
    FastLED.show();
    delay(5);
    FastLED.clear();
    flarePos += flareVel;
    flarePos = constrain(flarePos, 0, NUM_LEDS-1);
    flareVel += gravity;
    brightness *= .99; // OG = .98
  }  // while (flareVel >= -.2)
}  // end void flare
 
void explodeLoop() {
  int nSpark_var = random(2, 10);  // Bigger number is less BOOM sparks
  int nSparks = flarePos / nSpark_var; // OG: nSparks = flarePos / 2
  //Serial.println(String(nSparks));

   
  // initialize sparks
  for (int i = 0; i < nSparks; i++) {
    sparkPos[i] = flarePos; sparkVel[i] = (float(random(0, 20000)) / 10000.0) - 1.0; // from -1 to 1
    sparkCol[i] = abs(sparkVel[i]) * 500; // set colors before scaling velocity to keep them bright
    sparkCol[i] = constrain(sparkCol[i], 0, 255);
    sparkVel[i] *= flarePos / NUM_LEDS; // proportional to height
  }
  sparkCol[0] = 255; // OG: 255  This will be our known spark
  float dying_gravity = gravity;
  float c1 = random(80,130);  // OG: 120
  float c2 = random(1,30);   // OG: 50
  //Serial.println("c1 is: " + String(c1));
  //Serial.println("c2 is: " + String(c2));
    
 
  while(sparkCol[0] > c2/128) { // OG: (sparkCol[0] > c2/128)  As long as our known spark is lit, work with all the sparks
    int decay_rate = (random(0,50));  // Slow to decay the blast sparks.  (0,50) seems right. Bigger is slower.  OG: delay(0);
    delay(decay_rate);
    //Serial.println(String(decay_rate));
    FastLED.clear();
    
    for (int i = 0; i < nSparks; i++) {   
      sparkPos[i] += sparkVel[i];
      sparkPos[i] = constrain(sparkPos[i], 0, NUM_LEDS-1);
      sparkVel[i] += dying_gravity;
      sparkCol[i] *= .975;
      sparkCol[i] = constrain(sparkCol[i], 0, 255); // RED cross dissolve. OG: constrain(sparkCol[i], 0, 255);
      
      if(sparkCol[i] > c1) { // fade white to yellow
        leds[int(sparkPos[i])] = CRGB(random(0,255), random(200,255), (255 * (sparkCol[i] - c1)) / (255 - c1));  // OG: CRGB(255, 255, (255 * (sparkCol[i] - c1)) / (255 - c1));
      }
      else if (sparkCol[i] < c2) { // fade from red to black
        leds[int(sparkPos[i])] = CRGB((random(200,255) * sparkCol[i]) / c2, 0, 0); // OG: CRGB((255 * sparkCol[i]) / c2, 0, 0);
      }
      else { // fade from yellow to red
        leds[int(sparkPos[i])] = CRGB(random(0,255), (random(200,255) * (sparkCol[i] - c2)) / (c1 - c2), 0);  // OG: CRGB(255, (255 * (sparkCol[i] - c2)) / (c1 - c2), 0);
      }      
    }
    dying_gravity *= .99; // OG: dying_gravity *= .99;  As sparks burn out they fall slower
    FastLED.show();    
  }  // end while(sparkCol)
 
  delay(5);
  FastLED.clear();
  delay(5);  
  FastLED.show();
  Serial.println("Effect Complete!!!");
} // end void explodeLoop() 

-----

Saturday, December 23, 2023

Make Your Own Tombstone and SAVE!


-----

We saw this Hackaday article where [Proper DIY] used his woodworking skills to produce some excellent quality concrete signs and decorations.   We liked the idea but the effort required fashioning the wood for the letters seemed like a lot of work to us.

-----

So.... we have a 3D printer and set out to find an easier way.   The 'recipe' is pretty easy:

    1)Print your design on a 3D printer.     2)Glue the design to the bottom of a concrete mold.     3)Pour concrete, shake out the bubbles, and wait for curing.     4)Unscrew the mold and release the final product.

The results are good enough with only a fraction of the time (and skill).  

-----

Maybe not needed, but here is a little more detail:

- Build mold (use long wood screws to allow reuse):

- Print your 3D design and glue it the the bottom of the mold:


- Fill the mold, vibrate out the voids, then wait.  We used this material mainly because we had some on hand:

- Results:


-----

We are happy with outcome.  [Proper DIY] did have better results, but with a whole, whole, whole lot more effort.

-----

Monday, December 4, 2023

Measuring CW Keyer speed on the Flex 6400 and QRP Labs QCX


----

We are linking to the Alan W2AEW video above.  Alan's YouTube channel is an excellent resource for ham radio, test and measurement, as well as other electronics knowledge.   The video gave us the idea to check the CW keyer speeds on our most expensive rig and our lowest price rig.  It seemed like a good excuse to use the Liquid Instruments Moku:Lab oscilloscope, plus we were curious. 

----

We won't explain the method, Alan W2AEW does a great job with that in the video.  One different is we used the audio output for our delta(t) measurement.

-----

Here are our results:

We haven't seen the same RBN vs. Rig WPM speed different as Alan pointed out and the table helps explain why.  Sure, the numbers are 'off' at the 25WPM test, but we seldom operate at those CW speeds.

----

FlexRadio 6400: Moku:Lab oscilloscope captures:


-----

QRP Labs QCX: Moku:Lab oscilloscope captures:


-----

Friday, November 17, 2023

Vintage Megger turned Self Torture Device

-----

We found this ~60 year old Biddle Megger while going through the closet.  It was used by my father's and was no longer working.  The fix was possibly something simple, but we don't need a Megger so the crank voltage transformer became more interesting.  

-----

Just for the heck of it we decided to mount the crank voltage transformer and discover what it could still do. 

We knew based on the dial setting on the Megger that an output of ~1000 Volts AC was possible.  To not cook any of our instruments during the test we built 100K:1K Ohm resistive divider to tame the signal.  This makes the amplitude of the crank voltage transformer output about 100 times smaller.

Here the results using the Moku:Lab as our measurement tool.  This was easy duty for the Moku which has an 13 amazing instruments in one box and worth reading about.

----

Turning the crank as slow as we could yielded about ~480V RMS at 13Hz.   Touching the output terminals not was screamingly painful, but we did verify that it is uncomfortable to touch.

----

Max output was ~800V RMS at 55Hz and we wisely decided not to sample the pain level of this output.

-----

Friday, October 27, 2023

Automagically Switch an Idle FlexRadio to WSPR


-----

When our FlexRadio is not being used it really should do 'something'.   We typically put it in a WSPR spotting mode via WSJT-X, but sometimes we forget.  This short simple Python script takes care of that.

----

FlexRadio has an open API and we could have just used it to accomplish the project.  However, there is wonderful (and free) program that is always open on the PC running with the FlexRadio SmartSDR software that make things even easier.  We use FRStack for it's API calls and to automatically set things up for WSJT-X when the rig is idle.  NOTE: We use FRStack for other features as well.  IMO it is a must have program to make your Flex more flexible. 

-----

The Python script listed below looks at user defined intervals (in the example it is every 60 minutes) to see if any settings on the rig have changed.  If a setting has changed (frequency, band, mode, volume, filters, etc. etc. etc...) the program assumes the rig is in use and just waits for the next check interval. 


-----

If the time interval expires and no settings have been changed the program assumes the rig is idle and switches it to DIGU mode and starts reporting WSPR spots.


-----

# auto_wspr.py  OCT2023
# JUN2026 edits removes Slicemaster dependency
#
# Python script to make the Flex Radio switch to WSPR mode when idle.
#
# Written by:  WhiskeyTangoHotel.Com
#
# Leverages the auto LAUNCH feature of "Slice Master".
# We don't use Slicemaster for Spots.  
# Now prog excepts WSJT-X runs all the time.  Spots by FRSTACK
# https://github.com/K1DBO/slice-master-6000
#
# Leverages WSJT-X for TX/Rx spotting
# https://wsjt.sourceforge.io/wsjtx.html
#
# Leverages FRStack
# https://www.mkcmsoftware.com/download/FRStackWebApiReadme.html#apis

import requests
import urllib.request
import time
from datetime import datetime
import pytz

# Dictionary mapping city names to their respective timezones
city_timezones = {
    "austin": "America/Chicago"
    # Add more cities and their timezones if needed
}

city = "austin"  # Change this to any city you want to get the local time for

# Get the timezone for the given city
timezone = pytz.timezone(city_timezones.get(city.lower()))

# Set idle_max to the number of minutes between checks to see if any rig settings have changed.
# If idle rig then switch to DIGU mode.  DIGU mode will trigger Slice Master to start WSJT-X.

idle_max = 60    # in minutes,  How ofen to check to see if the rig is idle.

# 9 WSPR frequencies listed to cycle through
wspr_bands = [
    ("80m", 3.5686),
    ("40m", 7.0386),
    ("30m", 10.1387),
    ("20m", 14.0956),
    ("17m", 18.1046),
    ("15m", 21.0946),
    ("12m", 24.9246),
    ("10m", 28.1246),
    ("6m", 50.2930)
]

band_index = 0

last_status = 'First_run'
mode = ' '

#print ( 'Entering endless loop.....' )
while True:    
print ('Checking for rig activity every' , idle_max , 'minutes.')
print ('---------------------------------------------------')

# If rig is in DIGU mode then do nothing.  We are already running WXJT
response = requests.get('http://localhost:13522/api/ActiveSlice/MODE?')
response = response.text
mode = response
#print ('MODE is:' , response)
if response == '"DIGU"':

print('Rig already in DIGU mode.')
print('Cycling to next WSPR band.')

# Tune to the next WSPR band
band_name, freq = wspr_bands[band_index]

print(f"Switching to {band_name} WSPR ({freq} MHz)")

urllib.request.urlopen(
f'http://localhost:13522/api/ActiveSlice/FREQ?={freq}'
)

# Advance to the next band for the next idle cycle
band_index = (band_index + 1) % len(wspr_bands)

else:  # not in DIGU mode. Have rig settings changed or is it idle?

response = requests.get('http://localhost:13522/api/ActiveSlice/INFO?')
current_status = response.text

if last_status != current_status:

print('Rig in use. Do not change to DIGU. Do not launch WSJT')

last_status = current_status

else:

print('Rig has been idle for', idle_max, 'minutes.')

# DIGU modes can be LOUD. Adjust the volume to low
urllib.request.urlopen(
'http://localhost:13522/api/ActiveSlice/AUDIOGAIN?=+1'
)

# Switch rig to DIGU mode
urllib.request.urlopen(
'http://localhost:13522/api/ActiveSlice/MODE?=DIGU'
)

# Tune to the first WSPR band after becoming idle
band_name, freq = wspr_bands[band_index]

print(f"Switching to {band_name} WSPR ({freq} MHz)")

urllib.request.urlopen(
f'http://localhost:13522/api/ActiveSlice/FREQ?={freq}'
)

band_index = (band_index + 1) % len(wspr_bands)

# Remember this status so we don't repeatedly think the rig
# has just become idle.
last_status = current_status

for nextcheck in range(idle_max, 0, -1):
response = requests.get('http://localhost:13522/api/ActiveSlice/MODE?')
response = response.text
mode = response
response = requests.get('http://localhost:13522/api/ActiveSlice/FREQ?')
response = response.text
freq = response
local_time = datetime.now(timezone)
#print("-------------------------------")
#print(f"The local time in {city.capitalize()}, Texas is:", local_time.strftime("%Y-%m-%d %H:%M:%S %Z"))
print ('MODE:', mode, "@" , freq, '|', local_time.strftime("%H:%M:%S %Z"), "with",  int(nextcheck) , "minutes until next idle rig check...")
time.sleep(60)   # 60 because one minute increments expected.
print (' ')
# end endless while loop
-----

Saturday, May 27, 2023

HamAlert.Org Integration with Pimoroni Galactic Unicorn


-----

The Pimoroni Galactic Unicorn is a cool piece of kit that we have had our eye on for a while.  The item is popular and sells out quickly, but we finally got our hands on one.  Summary:  It's awesome!  After the initial "WOW!" factor diminished we went in search of a project for it.

-----

The answer was obvious.  How many times are you sitting comfortably in your home theater room with the family and you miss a Morse Code CQ from one of your ham radio friends?  That's what we thought, so we set out to solve that inconvenient and irritating problem!

-----

The project needs a WiFi connection for the Pimoroni Galactic Unicorn.  No ham radio or RF access to the ham bands are needed.  

Steps:

    - Buy a Pimoroni Galactic Unicorn and set it up to run MicroPython.

    - Create a HamAlert account and set up some triggers for the ham operators of interest.  You will need to select the "telnet" reporting option in the trigger menu.

    - Copy/Paste our MicroPython source code below into the Pimoroni Galactic Unicorn. We used Thonny as our development environment.  Name the program "main.py" so it will autostart at bootup.

    - Place the rig under that big screen TV in the home theater room.  Simply wait for your movie or favorite show to be interrupted letting you know it's time to drop everything and fire up your ham radio for a QSO!

-----

Here is a live demo of the setup.  What happens is:

    - K5JM, who is in my HamAlert triggers is spotted calling CQ.

    - The Pimoroni Galactic Unicorn is logged into and monitoring the HamAlert telenet server.

    - We parse the response of the HamAlert telnet server and display the information we want on the LED matrix.

    - Of course, we answer K5JM.  Success!!!  Next we return to the home theater room and await the next interruption.


 -----

Source code below:

 '''
Morse Alert
MAY2023
WhiskeyTangoHotel.Com

This program displays your individual hamalert.org telnet CW triggers
onto the display of the Raspberry PI PicoW based Pimoroni Galactic Unicorn.
Thanks HamAlert.Org by Manuel Kasper (HB9DQM) for their telnet service!

CW CQ info shown is "Callsign", "Frequency", and "WPM", but other options are available.
The text is color coded by band.
Scroll speed and total display variables are adjustable.
Alert 'chirp' is adjustable.

A CW beacon, such as WR5U which transmits about every 30 minutes,
may be a suggested hamalert telnet trigger to avoid timeouts from the
hamalert.org server.

NOTE: Does not work with hamalert.org simulated triggers

'''


#Variable set up:
wifi_ssid = "wifi_ssid"
wifi_password =  "wifi_password"

# hamalert.org login info
username = "telnet_username"
password = "telnet_passord"
telnetaddr = "hamalert.org"  # "telnetaddress.com"
port = 7300    # port as a number, not a string

from galactic import GalacticUnicorn
gu = GalacticUnicorn()

# Set up speaker for a sweeping 'chirp' alert
volume = .5 # range is 0 to 1.  0 = For no sound
start_tone = 500 #500 is a good start  Adjust to suit.
end_tone = 1000  #1000 is a good start.  Adjust to suit.
channels = [gu.synth_channel(i) for i in range(1)]

waitmsg = "HamAlert..."
howbright = 0.1 # value range 0.0 to 1.0
dwelltime = 5 # how many seconds to display Callsign, Freq, WPM
tot_time = 60 # how long (seconds) to cycle this info

utc_offset = -5 # we print to screen (not to LEDs the zulu and local time)

import network
import usocket as socket
import time
import utime

from picographics import PicoGraphics, DISPLAY_GALACTIC_UNICORN
graphics = PicoGraphics(display=DISPLAY_GALACTIC_UNICORN)

#Define some colours
BLACK = graphics.create_pen(0, 0, 0)
RED =  graphics.create_pen(255, 0, 0)
YELLOW = graphics.create_pen(255, 255, 0)
GREEN = graphics.create_pen(0, 255, 0)
CYAN =  graphics.create_pen(0, 255, 255)
BLUE =  graphics.create_pen(0, 0, 255)
MAGENTA =  graphics.create_pen(255, 0, 255)
WHITE =  graphics.create_pen(200, 200, 200)
GREY =  graphics.create_pen(100, 100, 100)
DRKGRY =  graphics.create_pen(50, 50, 50)
FREQCOLOR = WHITE  # this is the text color that will change per band
waitmsgcolor =  GREY  # number, not a string

# create a PicoGraphics framebuffer to draw into
graphics = PicoGraphics(display=DISPLAY_GALACTIC_UNICORN)
gu.set_brightness(howbright)

#Create a single wlan object and use as a global for all net calls
wlan = network.WLAN(network.STA_IF)

wlan.active(True)
wlan.connect(wifi_ssid, wifi_password)

# Wait for connect success or failure
max_wait = 100
while max_wait > 0:
    if wlan.status() < 0 or wlan.status() >= 3:
        break
    max_wait -= 1
    wifistat = 'WiFi...' + str(100-max_wait)
    if max_wait == 0:
        wifistat = "WiFi fail"
    print(wifistat)
    width = graphics.measure_text(wifistat, 1)
    startplace = int(float(GalacticUnicorn.WIDTH) - width) / 2
    # clear the graphics object
    graphics.set_pen(BLACK)
    graphics.clear()
    # draw the text
    graphics.set_pen(waitmsgcolor)
    graphics.text(wifistat, round(startplace), 2, -1, 0.55);    
    # update the display
    gu.update(graphics)
    time.sleep(.5)
    
if max_wait > 0:
    print("WIFI OK!")
    width = graphics.measure_text('WIFI OK!', 1)
    startplace = int(float(GalacticUnicorn.WIDTH) - width) / 2
    # clear the graphics object
    graphics.set_pen(BLACK)
    graphics.clear()
    # draw the text
    graphics.set_pen(waitmsgcolor)
    graphics.text('WIFI OK!', round(startplace), 2, -1, 0.55);    
    # update the display
    gu.update(graphics)    
    time.sleep(5)

# Connect to the telnet server
tn = socket.socket()
addr = socket.getaddrinfo(telnetaddr, port)[0][-1]
tn.connect(addr)

# Log in with the username and password to telnet server
tn.send(username + "\r\n")
tn.send(password + "\r\n")

last_spot = utime.time()  # we track/print time between spots

# Read and process the telnet server response
while True:
    data = tn.recv(1024)
    data = data.decode("utf-8")
    print(data)
    
    # Center "waitmsg"
    width = graphics.measure_text(waitmsg, 1)
    startplace = int(float(GalacticUnicorn.WIDTH) - width) / 2
    # clear the graphics object
    graphics.set_pen(BLACK)
    graphics.clear()
    # draw the text
    graphics.set_pen(waitmsgcolor)
    graphics.text(waitmsg, round(startplace), 2, -1, 0.55);    
    # update the display
    gu.update(graphics)

    # Play 'connected' Chirp alert
    for tone in range(start_tone, end_tone):
        channels[0].play_tone(tone, volume)
        gu.play_synth()
        time.sleep(.0009)
    gu.stop_playing()
    
    if "DX de" in data:
        #print(data)
                
        # Split the string into a list of values
        data_list = data.split()
        
        # Assign each value to separate variables
        dx = data_list[0]
        de = data_list[1]
        spotter = data_list[2]
        freq = data_list[3]
        spotted = data_list[4]
        db = data_list[5]
        wpm = data_list[6]
        zulu = data_list[7]

        # Print the values of the variables
        print("HamAlert returns:")
        #print('dx:', dx )
        #print('de:', de)
        #print('spotter:', spotter)
        print('Freq:', freq)
        print('Spotted:', spotted)
        #print('db:', db)
        print('WPM:', wpm)
        #print('zulu:', zulu)
        
        #Convert zulu to local
        hours = int(zulu[:2])
        minutes = int(zulu[2:4])     
        local_hours = hours + utc_offset
        local_minutes = minutes
        # If negative hour fix wraparound
        if local_hours < 0:
            local_hours += 24
        # Format to local timeg
        local_time = "{:02d}:{:02d}".format(local_hours, local_minutes)
        print('Local time:', local_time)
        #print('Minutes last spot:', int( (utime.time() - last_spot)/ 60)  )
        last_spot = utime.time()  # we track/print time between spots
        print('-------------------')
        print
        
        FREQCOLOR = WHITE
        band = float(freq)
        if 24890 <= band <= 24990:
            FREQCOLOR = CYAN # text color for 12 meter spots
        if 18068 <= band <= 18168:
            FREQCOLOR = BLUE # text color for 17 meter spots
        if 14000 <= band <= 14350:
            FREQCOLOR = MAGENTA  # text color for 20 meter spots          
        if 10100 <= band <= 10150:
            FREQCOLOR = RED # text color for 30 meter spots
        if 7000 <= band <= 7300:
            FREQCOLOR = YELLOW  # text color for 40 meter spots                  
        if 3500 <= band <= 4000:
            FREQCOLOR = GREEN # text color for 80 meter spots
        
        for x in range(0, int((tot_time/(dwelltime*3)))):
            # Center position of the text
            width = graphics.measure_text(spotted, 1)
            startplace = int(float(GalacticUnicorn.WIDTH) - width) / 2
            # clear the graphics object
            graphics.set_pen(BLACK)
            graphics.clear()
            # draw the text
            graphics.set_pen(FREQCOLOR)
            graphics.text(spotted, round(startplace), 2, -1, 0.55);
            # update the display
            gu.update(graphics)
            time.sleep(dwelltime)
            
            # Center position of the text
            width = graphics.measure_text(freq, 1)
            startplace = int(float(GalacticUnicorn.WIDTH) - width) / 2
            # clear the graphics object
            graphics.set_pen(BLACK)
            graphics.clear()
            # draw the text
            graphics.set_pen(FREQCOLOR)
            graphics.text(freq, round(startplace), 2, -1, 0.55);
            # update the display
            gu.update(graphics)            
            time.sleep(dwelltime)
            
            # Center position of the text
            width = graphics.measure_text(wpm, 1)
            startplace = int(float(GalacticUnicorn.WIDTH) - width) / 2
            # clear the graphics object
            graphics.set_pen(BLACK)
            graphics.clear()
            # draw the text
            graphics.set_pen(FREQCOLOR)
            graphics.text(wpm, round(startplace), 2, -1, 0.55);
            # update the display
            gu.update(graphics)
            time.sleep(dwelltime)
                
        #print(waitmsg)
       
        # Below if you want time of last spot shown.  This can help ID a telnet timeout.
        # See our reason for having a CW beacon comment at the very top.
        waitmsg = 'Last ' + local_time
        
        # This if you want the your pre-defined waitmsg after a spot
        #width = graphics.measure_text(waitmsg, 1)
        
        width = graphics.measure_text(waitmsg, 1)
        startplace = int(float(GalacticUnicorn.WIDTH) - width) / 2
        # clear the graphics object
        graphics.set_pen(BLACK)
        graphics.clear()
        # draw the text
        graphics.set_pen(waitmsgcolor)
        graphics.text(waitmsg, round(startplace), 2, -1, 0.55);
        # update the display
        gu.update(graphics)
-----


Monday, May 15, 2023

Low Cost Temperature Data Logger

 -----

We saw this Elitech RC-5+ Temperature Data Logger at Amazon for $19.95 USD.  The specs looked great and for the price we just had to give a try.  We were not disappointed.  

The ElitechLog software is a free download and provides easy to view graphs and stats on the gathered data.   Just to do 'something' with the unit we placed it in our refrigerator overnight in various locations.  Below are the overnight averages:

 ----- 

Here is a temperature graph taken over a 20 hour time period and a data point every 60 seconds.

 -----

More equally useless projects come to mind and we will post the them below as they happen.  In the end this is a great value and a useful tool.

-----

After getting a new LG refrigerator we reran the experiment (NOV2023):

 -----

Thursday, March 2, 2023

DIY Morse (CW) Key on the Cheap [Paddle Version]


 Schematics sent on request. HIHI.

-----

Monday, January 16, 2023

DIY Morse (CW) Key on the Cheap


Schematics sent on request. HIHI.

-----

Friday, September 16, 2022

Morse Code (CW) Paddle becomes Bug


-----

CW or Morse Code is a way ham radio operators send messages with a simple tone of two durations.  It was a must before the days of wireless voice communications and still remains popular because it is a fun challenge.  Like most things, Morse keys range from low cost to expensive.  Generally speaking Morse keys come in three styles: straight key, paddle, and bug.  Each has pros and cons requiring unique skills to operate with the "bug" typically being more expensive and requiring more skill.

To use this rig, you don't need a ham radio license unless you connect to an actually ham radio transmitter; which is kinda the whole point.  My quick ham radio advertisement:  Get a FCC Amateur Radio license; it's not hard and is an extremely interesting hobby.  BTW, learning Morse Code is no longer a requirement.

-----

We wanted to try a Morse bug key, but didn't want one 'forever' and didn't want to spend the money.   Plus like most ham radio operators we think any project is a good project regardless of it's usefulness.   Basically, with a bug key the dahs (dashes) are made manually and the dits (dots) are generated semi automatically via a spring mechanism.  The design is mechanically challenging so we opted for a different method.

-----

The dah (dash) part is easy.  For the semi automatic dash (dit) part the traditional mechanical spring system was replaced with a $10 signal generator kit.  Pressing the dit key powers up a 7404 and a square wave output is passed through the 7404 simply to provide the "umph" for the relay to open and close providing the dits.   The signal generator frequency control allows for an easy way to adjust the sending WPM (words per minute).


 The video shows our very first unpracticed test of the rig.   After a bit of practice we put the key on the air for a few SKCC QSOs.  Fun was had on our end and tolerance was shown by the OPs decoding our sig,

-----

Here are a few pics of the rig on the bench:


-----

And here's the schematic:

Of course, not the traditional Morse key bug, but a nice afternoon project diversion.  73!!!

-----

Saturday, July 30, 2022

@Cheerlights Project: Now with Sound

-----

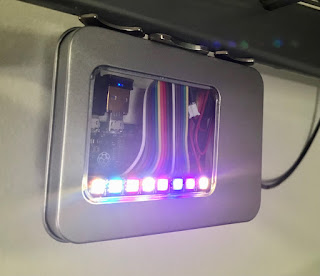
We did a @cheerlights project that used a Raspberry PI Zero and a Blinkt! LED bar to keep track of the last eight color changes the cheerlights server received.  We put the rig in the garage and enjoyed the Blinkt! LED bar change color as The Internet masses dictated what rainbow of colors would be displayed.  But, that wasn't enough.  To control CheerLights, send a tweet to @cheerlights or include “cheerlights” somewhere in your message with the name of a color. for example, @CheerLights Paint the town red. [UPDATE: After The RocketMan took over Twitter the API no longer functions.  To learn more about how to control any cheerlights project, including this one, go to https://cheerlights.com/]

-----

The Amazon impulse buy AI suggested that our life could be complete only if we spent $7.99US on the DollaTEK DY-SV17F mini MP3 module and an idea was born.  What if, we added sound to the existing @cheerlights project and a short MP3 sound clip was played in addition to the LED color change?   If The Internet masses demand 'purple' we change an LED to 'purple' and play a clip from the song "Purple Rain".   'pink' would trigger "Pink Cadillac".  'red' triggers "Red Red Wine".  You get the idea....

-----

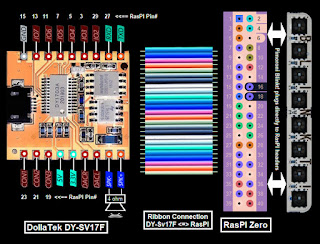
The DollaTEK DY-SV17F module has a UART mode to reduce the pins needed to control it, but the module is big on features and short on documentation for use with the Raspberry PI.   After not being able to get UART mode to work (probably user error) it was decided to use the plentiful GPIO pins on the Raspberry PI Zero and go with a parallel interface solution.   Here is a short video of the result: 

----- 

Connection was straightforward:


 The rig looked like this on the bench:

Packaged and mounted in the garage:

 
-----

For the rig to work the two python programs below run on the RasPI at the same time; cheerlights.py and cheerlights_sound.py.

-----

The cheerlights.py source code below updates the LEDs on the Blinkt! LED bar:

 #!/usr/bin/env python

# Cheerlights with Pimoroni BlinkT module and RasPI Zero
#
# A tweet to @Cheerlights will change the LEFT most color of the BlinkT (LED#7)
# Color history maintained by shifting old color to the RIGHT (LED#0)

# Valid color tweets to @Cheerlights are:
# RED GREEN BLUE CYAN WHITE OLDLACE PURPLE MAGENTA YELLOW ORANGE PINK
#
# Project details at:
# WhiskeyTangoHotel.Com
#
# MARCH 2022
# JULY 2022 add DollaTek DY-SV17F to play sound clip pwr color as independent and seperate program
#

import time
import sys

try:
    import requests  #  needed to poll @Cheerlights
except ImportError:
    exit("Install needed to run. Use the command: sudo pip install requests")

from blinkt import set_clear_on_exit, set_pixel, show, set_brightness, clear # https://shop.pimoroni.com/products/blinkt#

LED_delay = 0.5
brightness = 0.1 # 0.05 is lowest useable dim.  1.0 is full bright (the BLINKT is *really* bright if you want!)

#Set up a matrix for r, g, b values (m stands for matrix)
rm = [0,1,2,3,4,5,6,7,8]
gm = [0,1,2,3,4,5,6,7,8]
bm = [0,1,2,3,4,5,6,7,8]

# set_pixel(pixel_no, red, green, blue, brightness)

print "Testing LEDs..."
print "---------------------------------------------"
for i in range(3):
    for j in range (0,8):
        set_pixel(j, 30, 0, 0, brightness)
    print "RED"
    show()
    time.sleep(LED_delay)
    for j in range (0,8):
        set_pixel(j, 0, 30, 0, brightness)
    print "GREEN"
    show()
    time.sleep(LED_delay)
    for j in range (0,8):
        set_pixel(j, 0, 0, 30, brightness)
    print "BLUE"
    show()
    time.sleep(LED_delay)

    # all LEDs off
    for j in range (0,8):
        set_pixel(j, 0, 0,0)
    show()
print "LED Self test complete!"

for j in range (0,8): # set values that we know are 'wrong' to enter main loop
    rm[j] = 73.73
    gm[j] = 73.73
    bm[j] = 73.73
print " "

while True:
    try:
        r = requests.get('http://api.thingspeak.com/channels/1417/field/2/last.json')
        col = r.json()['field2']
        r, g, b = tuple(ord(c) for c in col[1:].lower().decode('hex'))
        time.sleep(5)  # delay until we look for a new color change


        if (r != rm[7]) or (g != gm[7]) or (b != bm[7]):  # new color selected
            print "New color placed far LEFT.  Shift old colors RIGHT one place"
            for j in range (0,7): #shift in the new values
                rm[j] = rm[j+1]
                gm[j] = gm[j+1]
                bm[j] = bm[j+1]               
                set_pixel(j, rm[j], gm[j], bm[j], brightness)
                show()
                time.sleep(LED_delay) # show change as a sweep

            rm[7] = r
            gm[7] = g
            bm[7] = b
            set_pixel(7, rm[7], gm[7], bm[7], brightness)
            show()
    
    # All LED off on control C
    except KeyboardInterrupt:
        print("stopping ...")
        sys.exit(0)
    except:
        time.sleep(1)
-----

The cheerlights_sound.py source code below runs the DollaTEK DY-SV17F:


# Cheerlights with DY-SV17F module for sound and RasPI Zero
#
# A tweet to @Cheerlights will play sound file

# Valid color tweets to @Cheerlights are:
# RED GREEN BLUE CYAN WHITE OLDLACE PURPLE MAGENTA YELLOW ORANGE PINK
#
# Project details at:
# WhiskeyTangoHotel.Com
#
# MARCH 2022
# JULY 2022 add DollaTek DY-SV17F to play sound clip pwr color as independent and seperate program
#

# DallaTEK DY-SV17F Files mapped to Cheerlights color.  MP3s vary from ~10-30 secs
# 00001.mp3 = red (red red wine)
# 00002.mp3 = green (green green gras of home)
# 00003.mp3 = blue (blue bayoe)
# 00004.mp3 = cyan (call me cyan)
# 00005.mp3 = white (whiter shade of pale)
# 00006.mp3 = oldlace (leather and lace)
# 00007.mp3 = purple (purple rain [of course])
# 00008.mp3 - magenta (some song calll 'magenta')
# 00009.mp3 = yellow (yellow submarine)
# 00010.mp3 = orange (orange crush)
# 00011.mp3 = pink (pink cadi)
# 00012.mp3 = start speaker test file (start me up)

import time
import requests  #  needed to poll @Cheerlights

import RPi.GPIO as GPIO
GPIO.setmode(GPIO.BOARD) # to use Raspberry PI board pin numbers

#Define some pins and vars
IO_0 = 31
IO_1 = 29
IO_2 = 3
IO_3 = 5
IO_4 = 7
IO_5 = 11
IO_6 = 13
IO_7 = 15

CON_1 = 19
CON_2 = 21
CON_3 = 23

current_color_mp3 = "clear" # set color value that we know is 'wrong' to enter main loop
delta_time = 0 # track seconds since last color change

#Setup the GPIO and make sure the speaker is OFF

GPIO.setwarnings(False)  # To disable warnings.
GPIO.setup(IO_0, GPIO.OUT)
GPIO.setup(IO_1, GPIO.OUT)
GPIO.setup(IO_2, GPIO.OUT)
GPIO.setup(IO_3, GPIO.OUT)
GPIO.setup(IO_4, GPIO.OUT)
GPIO.setup(IO_5, GPIO.OUT)
GPIO.setup(IO_6, GPIO.OUT)
GPIO.setup(IO_7, GPIO.OUT)

GPIO.setup(CON_1, GPIO.OUT)
GPIO.setup(CON_2, GPIO.OUT)
GPIO.setup(CON_3, GPIO.OUT)   #HIGH = speaker sound.  LOW = sound off

GPIO.output(CON_1, GPIO.LOW)
GPIO.output(CON_2, GPIO.LOW)
GPIO.output(CON_3, GPIO.LOW) #HIGH = speaker sound.  LOW = sound off

# Test the speaker at startup
print "Testing speaker..."
GPIO.output(CON_3, GPIO.HIGH) # turn ON the speaker   

GPIO.output(IO_0, GPIO.HIGH)
GPIO.output(IO_1, GPIO.HIGH)
GPIO.output(IO_2, GPIO.LOW)
GPIO.output(IO_3, GPIO.LOW)
GPIO.output(IO_4, GPIO.HIGH)
GPIO.output(IO_5, GPIO.HIGH)
GPIO.output(IO_6, GPIO.HIGH)
GPIO.output(IO_7, GPIO.HIGH)
time.sleep(5)   # secs in this mp3
GPIO.output(CON_3, GPIO.LOW) # turn OFF the speaker
print "Speaker test complete!"
print

while True: # main loop
    # ID the Color and Play the MP3 file asscd with that color
    r = requests.get('http://api.thingspeak.com/channels/1417/field/1/last.json')
    color_mp3 = r.json()['field1']
    #color_mp3 = "pink"   # override color_mp3 var for debug.
    print str(delta_time * 5) + " seconds spent waiting for color change..."
    time.sleep(5)  # delay until we look for a new color change
    delta_time = delta_time + 1
    
    if (color_mp3 != current_color_mp3):  # new color selected
        current_color_mp3 = color_mp3
        delta_time = 0
        print color_mp3 + " found and..."

        if (color_mp3 == "red"): #  is 00001.mp3
            GPIO.output(CON_3, GPIO.HIGH) # turn ON the speaker   
           
            GPIO.output(IO_0, GPIO.LOW)
            GPIO.output(IO_1, GPIO.HIGH)
            GPIO.output(IO_2, GPIO.HIGH)
            GPIO.output(IO_3, GPIO.HIGH)
            GPIO.output(IO_4, GPIO.HIGH)
            GPIO.output(IO_5, GPIO.HIGH)
            GPIO.output(IO_6, GPIO.HIGH)
            GPIO.output(IO_7, GPIO.HIGH)
            time.sleep(19)   # secs in this mp3
            GPIO.output(CON_3, GPIO.LOW) # turn OFF the speaker

        if (color_mp3 == "green"): #  is 00002.mp3
            GPIO.output(CON_3, GPIO.HIGH) # turn ON the speaker   
           
            GPIO.output(IO_0, GPIO.HIGH)
            GPIO.output(IO_1, GPIO.LOW)
            GPIO.output(IO_2, GPIO.HIGH)
            GPIO.output(IO_3, GPIO.HIGH)
            GPIO.output(IO_4, GPIO.HIGH)
            GPIO.output(IO_5, GPIO.HIGH)
            GPIO.output(IO_6, GPIO.HIGH)
            GPIO.output(IO_7, GPIO.HIGH)
            time.sleep(33)   # secs in this mp3
            GPIO.output(CON_3, GPIO.LOW) # turn OFF the speaker
           
        if (color_mp3 == "blue"): #  is 00003.mp3
            GPIO.output(CON_3, GPIO.HIGH) # turn ON the speaker   
           
            GPIO.output(IO_0, GPIO.LOW)
            GPIO.output(IO_1, GPIO.LOW)
            GPIO.output(IO_2, GPIO.HIGH)
            GPIO.output(IO_3, GPIO.HIGH)
            GPIO.output(IO_4, GPIO.HIGH)
            GPIO.output(IO_5, GPIO.HIGH)
            GPIO.output(IO_6, GPIO.HIGH)
            GPIO.output(IO_7, GPIO.HIGH)
            time.sleep(20)   # secs in this mp3
            GPIO.output(CON_3, GPIO.LOW) # turn OFF the speaker
           
        if (color_mp3 == "cyan"): #  is 00004.mp3
            GPIO.output(CON_3, GPIO.HIGH) # turn ON the speaker   
           
            GPIO.output(IO_0, GPIO.HIGH)
            GPIO.output(IO_1, GPIO.HIGH)
            GPIO.output(IO_2, GPIO.LOW)
            GPIO.output(IO_3, GPIO.HIGH)
            GPIO.output(IO_4, GPIO.HIGH)
            GPIO.output(IO_5, GPIO.HIGH)
            GPIO.output(IO_6, GPIO.HIGH)
            GPIO.output(IO_7, GPIO.HIGH)
            time.sleep(16)   # secs in this mp3
            GPIO.output(CON_3, GPIO.LOW) # turn OFF the speaker
           
        if (color_mp3 == "white"): #  is 00005.mp3
            GPIO.output(CON_3, GPIO.HIGH) # turn ON the speaker   
           
            GPIO.output(IO_0, GPIO.LOW)
            GPIO.output(IO_1, GPIO.HIGH)
            GPIO.output(IO_2, GPIO.LOW)
            GPIO.output(IO_3, GPIO.HIGH)
            GPIO.output(IO_4, GPIO.HIGH)
            GPIO.output(IO_5, GPIO.HIGH)
            GPIO.output(IO_6, GPIO.HIGH)
            GPIO.output(IO_7, GPIO.HIGH)
            time.sleep(19)   # secs in this mp3
            GPIO.output(CON_3, GPIO.LOW) # turn OFF the speaker
           
        if (color_mp3 == "oldlace"): #  is 00006.mp3
            GPIO.output(CON_3, GPIO.HIGH) # turn ON the speaker   
           
            GPIO.output(IO_0, GPIO.HIGH)
            GPIO.output(IO_1, GPIO.LOW)
            GPIO.output(IO_2, GPIO.LOW)
            GPIO.output(IO_3, GPIO.HIGH)
            GPIO.output(IO_4, GPIO.HIGH)
            GPIO.output(IO_5, GPIO.HIGH)
            GPIO.output(IO_6, GPIO.HIGH)
            GPIO.output(IO_7, GPIO.HIGH)
            time.sleep(27)   # secs in this mp3
            GPIO.output(CON_3, GPIO.LOW) # turn OFF the speaker
           
        if (color_mp3 == "purple"): #  is 00007.mp3
            GPIO.output(CON_3, GPIO.HIGH) # turn ON the speaker   
           
            GPIO.output(IO_0, GPIO.LOW)
            GPIO.output(IO_1, GPIO.LOW)
            GPIO.output(IO_2, GPIO.LOW)
            GPIO.output(IO_3, GPIO.HIGH)
            GPIO.output(IO_4, GPIO.HIGH)
            GPIO.output(IO_5, GPIO.HIGH)
            GPIO.output(IO_6, GPIO.HIGH)
            GPIO.output(IO_7, GPIO.HIGH)
            time.sleep(25)   # secs in this mp3
            GPIO.output(CON_3, GPIO.LOW) # turn OFF the speaker
           
        if (color_mp3 == "magenta"): #  is 00008.mp3
            GPIO.output(CON_3, GPIO.HIGH) # turn ON the speaker   
           
            GPIO.output(IO_0, GPIO.HIGH)
            GPIO.output(IO_1, GPIO.HIGH)
            GPIO.output(IO_2, GPIO.HIGH)
            GPIO.output(IO_3, GPIO.LOW)
            GPIO.output(IO_4, GPIO.HIGH)
            GPIO.output(IO_5, GPIO.HIGH)
            GPIO.output(IO_6, GPIO.HIGH)
            GPIO.output(IO_7, GPIO.HIGH)
            time.sleep(26)   # secs in this mp3
            GPIO.output(CON_3, GPIO.LOW) # turn OFF the speaker
           
        if (color_mp3 == "yellow"): #  is 00009.mp3
            GPIO.output(CON_3, GPIO.HIGH) # turn ON the speaker   
           
            GPIO.output(IO_0, GPIO.LOW)
            GPIO.output(IO_1, GPIO.HIGH)
            GPIO.output(IO_2, GPIO.HIGH)
            GPIO.output(IO_3, GPIO.LOW)
            GPIO.output(IO_4, GPIO.HIGH)
            GPIO.output(IO_5, GPIO.HIGH)
            GPIO.output(IO_6, GPIO.HIGH)
            GPIO.output(IO_7, GPIO.HIGH)
            time.sleep(18)   # secs in this mp3
            GPIO.output(CON_3, GPIO.LOW) # turn OFF the speaker
           
        if (color_mp3 == "orange"): #  is 00010.mp3
            GPIO.output(CON_3, GPIO.HIGH) # turn ON the speaker   
           
            GPIO.output(IO_0, GPIO.HIGH)
            GPIO.output(IO_1, GPIO.LOW)
            GPIO.output(IO_2, GPIO.HIGH)
            GPIO.output(IO_3, GPIO.LOW)
            GPIO.output(IO_4, GPIO.HIGH)
            GPIO.output(IO_5, GPIO.HIGH)
            GPIO.output(IO_6, GPIO.HIGH)
            GPIO.output(IO_7, GPIO.HIGH)
            time.sleep(22)   # secs in this mp3
            GPIO.output(CON_3, GPIO.LOW) # turn OFF the speaker
           
        if (color_mp3 == "pink"): #  is 00010.mp3
            GPIO.output(CON_3, GPIO.HIGH) # turn ON the speaker   
           
            GPIO.output(IO_0, GPIO.LOW)
            GPIO.output(IO_1, GPIO.LOW)
            GPIO.output(IO_2, GPIO.HIGH)
            GPIO.output(IO_3, GPIO.LOW)
            GPIO.output(IO_4, GPIO.HIGH)
            GPIO.output(IO_5, GPIO.HIGH)
            GPIO.output(IO_6, GPIO.HIGH)
            GPIO.output(IO_7, GPIO.HIGH)
            time.sleep(25)   # secs in this mp3
            GPIO.output(CON_3, GPIO.LOW) # turn OFF the speaker
    
        print color_mp3 + " playing completed!"
        print
-----